Introduction
This is an example of React Navigation Header Customization in React Native using Navigation Options. In this example, we will see how to customise the Navigation bar/ Navigation header. React Native does not provide any header by default, it comes when we add React Navigation to switch the activity.
Sometimes we have to customize the header according to the needs and we can easily do it with the help of navigation options. In this post, we will see the full customized header and customization of the right and left header.
Header Title Customisation using
React.useLayoutEffect(() => {
  navigation.setOptions({
    headerTitle: (props) => (
      <Text {...props} style={{color: 'white', fontWeight: 'bold'}}>
        Custom Title
      </Text>
    ),
    headerStyle: {
      backgroundColor: '#f4511e', //Set Header color
    },
  });
}, [navigation]);
Left and Right Header Customization using
React.useLayoutEffect(() => {
  navigation.setOptions({
    title: 'Second Page', //Set Header Title
    headerStyle: {
      backgroundColor: '#f4511e', //Set Header color
    },
    headerTintColor: '#fff', //Set Header text color
    headerTitleStyle: {
      fontWeight: 'bold', //Set Header text style
    },
    headerLeft: () => (
      <TouchableOpacity
        onPress={() => alert('Left Menu Clicked')}
        style={{marginLeft: 10}}>
        <Text style={{color: 'white'}}>Left Menu</Text>
      </TouchableOpacity>
    ),
    headerRight: () => (
      <TouchableOpacity
        onPress={() => alert('Right Menu Clicked')}
        style={{marginRight: 10}}>
        <Text style={{color: 'white'}}>Right Menu</Text>
      </TouchableOpacity>
    ),
  });
}, [navigation]);
In this example, We will create two screens and we will switch between them using React Navigation. On the first screen, you will see how to add custom title in header and on the second screen, you will see the left and right header customisation.
To Make a React Native App
Getting started with React Native will help you to know more about the way you can make a React Native project. We are going to use react native command line interface to make our React Native App.
If you have previously installed a global react-native-cli package, please remove it as it may cause unexpected issues:
npm uninstall -g react-native-cli @react-native-community/cliRun the following commands to create a new React Native project
npx react-native init ProjectNameIf you want to start a new project with a specific React Native version, you can use the --version argument:
npx react-native init ProjectName --version X.XX.XNote If the above command is failing, you may have old version of react-native or react-native-cli installed globally on your pc. Try uninstalling the cli and run the cli using npx.
This will make a project structure with an index file named App.js in your project directory.
Installation of Dependencies
To navigate between screens we need to add react-navigation and other supporting dependencies.
To install the dependencies open the terminal and jump into your project
cd ProjectName1. Install react-navigation
npm install @react-navigation/native --save2. Other supporting libraries react-native-screens and react-native-safe-area-context
npm install react-native-screens react-native-safe-area-context --savereact-native-screens package requires one additional configuration step to properly work on Android devices. Edit MainActivity.java file which is located in android/app/src/main/java/<your package name>/MainActivity.java.
Add the following code to the body of MainActivity class:
@Override
protected void onCreate(Bundle savedInstanceState) {
  super.onCreate(null);
}
and make sure to add the following import statement at the top of this file below your package statement:
import android.os.Bundle;This change is required to avoid crashes related to View state being not persisted consistently across Activity restarts.
3. For the Stack Navigator install
npm install @react-navigation/native-stack --saveCocoaPods Installation
Please use the following command to install CocoaPods
npx pod-installProject Structure
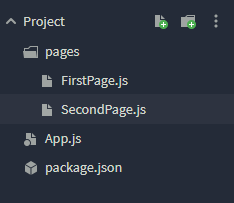
To start with this Example you need to create a directory named pages in your project and create two files FirstPge.js and SecondPage.js
Code
Now Open App.js in any code editor and replace the code with the following code
App.js
// React Navigation Header Customization in RN using Navigation Options
// https://aboutreact.com/custom-header-using-navigation-options-in-react-native/

import React from 'react';

import {NavigationContainer} from '@react-navigation/native';
import {createNativeStackNavigator} from '@react-navigation/native-stack';

import FirstPage from './pages/FirstPage';
import SecondPage from './pages/SecondPage';

const Stack = createNativeStackNavigator();

const App = () => {
  return (
    <NavigationContainer>
      <Stack.Navigator initialRouteName="FirstPage">
        <Stack.Screen name="FirstPage" component={FirstPage} />
        <Stack.Screen name="SecondPage" component={SecondPage} />
      </Stack.Navigator>
    </NavigationContainer>
  );
};

export default App;
Open FirstPage.js in any code editor and replace the code with the following code.
FirstPage.js
// React Navigation Header Customization in RN using Navigation Options
// https://aboutreact.com/custom-header-using-navigation-options-in-react-native/

import React from 'react';
import {
  SafeAreaView,
  StyleSheet,
  Text,
  TouchableOpacity,
  View,
} from 'react-native';

const FirstPage = ({navigation}) => {
  React.useLayoutEffect(() => {
    navigation.setOptions({
      headerTitle: (props) => (
        <Text
          {...props}
          style={{color: 'white', fontWeight: 'bold'}}>
          Custom Title
        </Text>
      ),
      headerStyle: {
        backgroundColor: '#f4511e', //Set Header color
      },
    });
  }, [navigation]);

  return (
    <SafeAreaView style={{flex: 1, backgroundColor: 'white'}}>
      <View style={styles.container}>
        <Text style={styles.header}>
          React Navigation Header Customisation in
          RN using Navigation Options
        </Text>
        <Text>Full Customized Header</Text>

        <TouchableOpacity
          onPress={() => navigation.navigate('SecondPage')}
          activeOpacity={0.7}
          style={styles.buttonStyle}>
          <Text style={styles.textStyle}>
            Click to see Left and Right align header
          </Text>
        </TouchableOpacity>
      </View>
      <Text style={{textAlign: 'center', color: 'grey'}}>
        www.aboutreact.com
      </Text>
    </SafeAreaView>
  );
};

export default FirstPage;

const styles = StyleSheet.create({
  container: {
    flex: 1,
    justifyContent: 'center',
    alignItems: 'center',
    padding: 16,
  },
  header: {
    fontSize: 25,
    textAlign: 'center',
    marginVertical: 16,
  },
  buttonStyle: {
    width: '100%',
    height: 40,
    padding: 10,
    backgroundColor: '#808080',
    borderRadius: 2,
    marginTop: 12,
  },
  textStyle: {
    color: '#fff',
    textAlign: 'center',
  },
});
Open SecondPage.js in any code editor and replace the code with the following code.
SecondPage.js
// React Navigation Header Customization in RN using Navigation Options
// https://aboutreact.com/custom-header-using-navigation-options-in-react-native/

import React from 'react';
import {
  SafeAreaView,
  StyleSheet,
  View,
  Text,
  TouchableOpacity,
} from 'react-native';

const SecondPage = ({navigation}) => {
  React.useLayoutEffect(() => {
    navigation.setOptions({
      title: 'Second Page', //Set Header Title
      headerStyle: {
        backgroundColor: '#f4511e', //Set Header color
      },
      headerTintColor: '#fff', //Set Header text color
      headerTitleStyle: {
        fontWeight: 'bold', //Set Header text style
      },
      headerLeft: () => (
        <TouchableOpacity
          onPress={() => alert('Left Menu Clicked')}
          style={{marginLeft: 10}}>
          <Text style={{color: 'white'}}>Left Menu</Text>
        </TouchableOpacity>
      ),
      headerRight: () => (
        <TouchableOpacity
          onPress={() => alert('Right Menu Clicked')}
          style={{marginRight: 10}}>
          <Text style={{color: 'white'}}>Right Menu</Text>
        </TouchableOpacity>
      ),
    });
  }, [navigation]);

  return (
    <SafeAreaView style={{flex: 1, backgroundColor: 'white'}}>
      <View style={styles.container}>
        <Text style={styles.header}>
          React Navigation Header Customisation in
          RN using Navigation Options
        </Text>
        <Text>Left and Right Custom navigation bar</Text>
      </View>
      <Text style={{textAlign: 'center', color: 'grey'}}>
        www.aboutreact.com
      </Text>
    </SafeAreaView>
  );
};

export default SecondPage;

const styles = StyleSheet.create({
  container: {
    flex: 1,
    justifyContent: 'center',
    alignItems: 'center',
    padding: 16,
  },
  header: {
    fontSize: 25,
    textAlign: 'center',
    marginVertical: 16,
  },
  textStyle: {
    color: '#fff',
    textAlign: 'center',
  },
});
To Run the React Native App
Open the terminal again and jump into your project using.
cd ProjectName1. Start Metro Bundler
First, you will need to start Metro, the JavaScript bundler that ships with React Native. To start Metro bundler run following command:
npx react-native startOnce you start Metro Bundler it will run forever on your terminal until you close it. Let Metro Bundler run in its own terminal. Open a new terminal and run the application.
2. Start React Native Application
To run the project on an Android Virtual Device or on real debugging device:
npx react-native run-androidor on the iOS Simulator by running (macOS only)
npx react-native run-iosOutput Screenshots


Output in Online Emulator
This is how you can Customize Header using Navigation Options in React Native. If you have any doubts or you want to share something about the topic you can comment below or contact us here. There will be more posts coming soon. Stay tuned!
Hope you liked it. 🙂